Last Updated on: August 9th, 2021

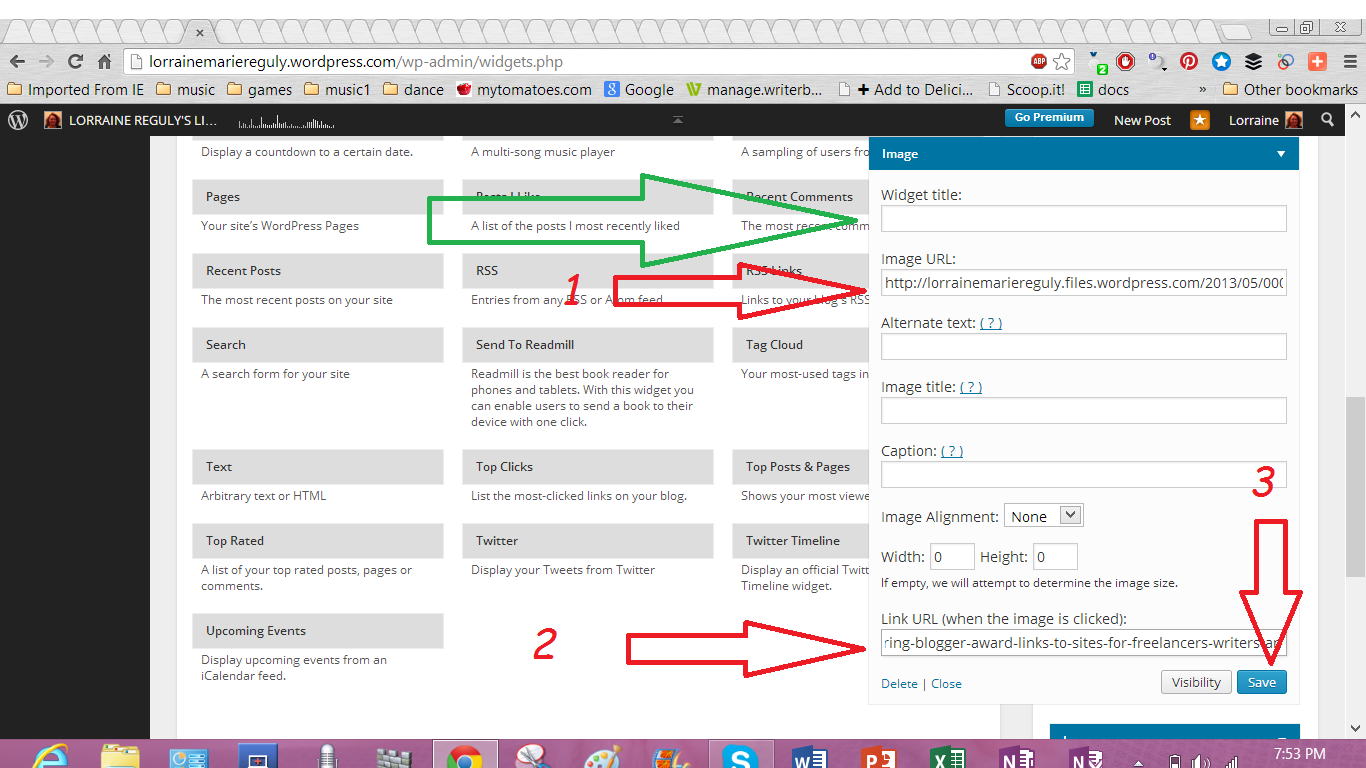
This is a screenshot of the backend of my blog, and shows you the things you need to do to display images on your blog’s sidebar.
Adding images to your sidebar is not as easy as 1, 2. 3. But it can be! Just remember to customize and edit your images with a good photo editor, such as Colorcinch (aff link)!
Please read this post first, then enlarge your screen and watch the video. (Instructions are given on how to make your screen bigger, too, so don’t worry!)
The above screenshot shows you the basics, but not how to adjust the size. For that, you’ll have to watch the video!
The video will tell you how to add images to your sidebar. Images include the awards that new bloggers receive, and so I am posting this for them! Lately, many people have been clicking on my award posts, mainly for The Liebster Award (it is currently number one in the search engines!), and since these bloggers are newbies (like I was, months ago!), I decided to answer a question one blogger had (ironically, the person who tagged me as IT) about how to add images to your sidebar.
Adding them is not that difficult, but requires a few steps. I explain these in this the video below, and show you how to do it at the same time. Unfortunately, you must listen and watch simultaneously; I tried my best to keep things simple, but you may want to enlarge your screen before attempting to watch this video. On a computer or laptop, you can do this by pressing the CTRL and then the + buttons. Repeating this action will enlarge your screen many times if you repeat it many times. Since I only have a laptop and not a tablet or a phone, I have no idea how to do this with those devices. Remember, I’m not a technical person!!! I have, however, figured out how to add images to my blog’s sidebar. Now you can, too, by watching this video!
Please share this post with your friends. Help them add images to their sidebars, too!


Thank you for the information! You’re a lifesaver!
Taylor~
Since you found this so helpful, Taylor, I’d appreciate it if you shared this information with others – on Twitter, Facebook, G+, or wherever… THANKS for the compliment! 🙂 I’m happy to help!
Hi! I stumbled upon this blog of yours. Looks like we have a lot in common! I am a teacher and a freelance writer on the side. I just started my blog a few months ago. 🙂 Just wanted to say HI!
Beth
Hi, Beth! Nice to meet you!
I’d like to invite you to post your links on my Promote Yourself! page. 😀
Thanks for your video. I hope it was ok that I posted it on my award site. It’ll help the nominees get it right as it helped me learn how to do it as well. Thanks for visiting me too. I expect I can learn a lot from you! 😉
Cheers!
Steve
You’re welcome, Steve! Thanks for subscribing to my blog!
I definitely love that you included a link to my post on your site. 🙂 Thank-you!
Great tips. To go a step further, which involves embedding some code into the post, Molly Greene posted instructions a couple of months ago on how to get the sidebar widget pictures to open in a new window.
Thanks for the info, Jeri. I have added a link to her post about this to my post! 🙂
I do the same thing as Glyniss but with photoshop and Mac IPhoto it so much easier and it’s done. It also helps that I have a web guy to help when I get stuck… LOL. 🙂
I am my own “web guy”. And not a very good one at that.
Oh well….
I edit my images offline with PaintShop Pro. This program is kind of pricey though. There is the graphic program Gimp that does some of the things PSP does and is free.
I have heard of Gimp and a few others that are free; I might look into using them. I cannot afford to buy anything else for a while!
Thank you for this very practical and user friendly guide – love it and love your new blog theme.
Thanks for the love! I was getting tired of my old theme; I think the newer one is way more sleek!
I am happy you found the guide useful. 🙂
Thanks for this Lorraine. Doesn’t it feel like there is always something new to figure out? 🙂
Yes!!! Blogging tips are endless, that’s for sure!