5 Website Changes You Need to Make ASAP (+ a tutorial)

5 Website Changes You Need to Make ASAP

If you are a blogger and have a self-hosted website, you are considered a webmaster. As a webmaster, you are responsible for the smooth operations of your site.

To improve your site (for both yourself and for your audience), there are several things you need to do. These include optimizing your images, increasing your page speed, and adding an SSL certificate to your site. It also includes using a responsive theme and eliminating pop-ups. This last point is particularly important because Google’s algorithm update in January 2017 is going to penalize websites that have specific types of pop-ups. (We will get into this more in Point #5.)

In this article, we will look at why you should make these changes and how you can make them.

Once you have made the recommended changes, the end result will give you a better website and improve your users’ experiences! You will also avoid penalization from Google!

The following is an outline of the 5 website changes you need to make, and the sub-points included in this article:

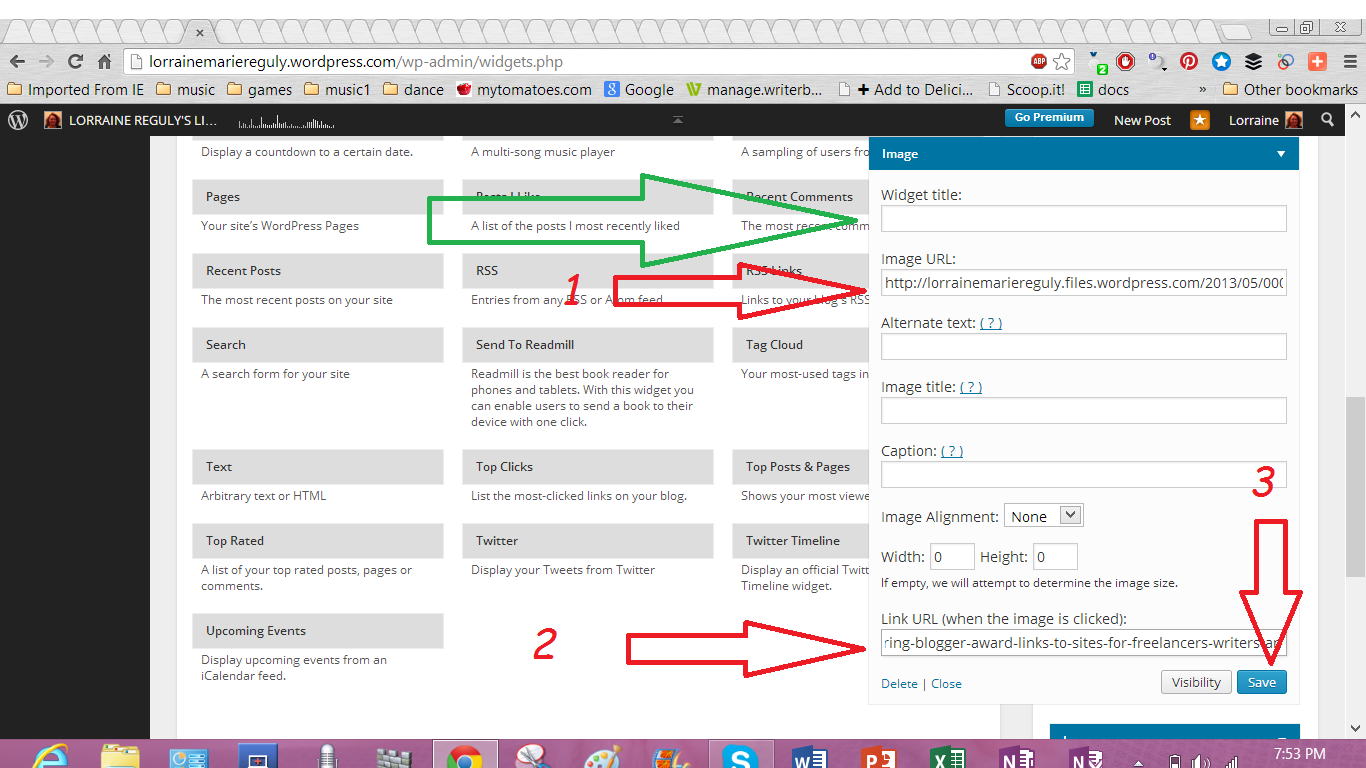
1: Optimize and Compress Your Images

  • some notes on image optimization
  • which plugin you can use to Bulk Optimize your existing website images
  • screenshots that show you how to do this
  • How to use Pixlr Express to compress your images (a step-by-step tutorial)

2: Increase Your Page Speed

  • How to Optimize Your Site and Make it Faster

3: Add an SSL Certificate to Your Website

  • 3 Reasons Why You Need An SSL
  • How and Why I Installed an SSL on Wording Well
  • How You Can Get SSL-Certified

4: Ensure You Are Using a Responsive Theme

  • 3 tests/tools to use to check how your site looks on all devices

5: Delete Pop-Ups to Avoid Penalization from Google

  • a history of Google’s algorithm updates
  • which pop-ups will be penalized
  • which pop-ups will be allowed

Read More

How to Create Image Quotes for Your Blog Posts #tutorial with #video

This image says "How to Create Image Quotes."


Image quotes. We’ve all seen ’em.

They’re popular. Everyone loves ’em.

But not everyone knows how to create them. Heck, most people don’t even know how to use a photo editor, such as Colorcinch (aff link). (FYI, Colorcinch is easy and fun to use… and makes ANY image look AMAZING!)

Today I am going to teach you what image quote s are, why you should use image quotes in your blog posts, how you can create image quotes for your blog posts, and how you can watermark your images.

You can do this all for free, too! Read More

How to Add Images to Your Sidebar

This is a screenshot of the backend of my blog, and shows you the things you need to do to display images on your blog's sidebar.

This is a screenshot of the backend of my blog, and shows you the things you need to do to display images on your blog’s sidebar.

Adding images to your sidebar is not as easy as 1, 2. 3. But it can be! Just remember to customize and edit your images with a good photo editor, such as Colorcinch (aff link)!

Please read this post first, then enlarge your screen and watch the video. (Instructions are given on how to make your screen bigger, too, so don’t worry!)

The above screenshot shows you the basics, but not how to adjust the size. For that, you’ll have to watch the video!

The video will tell you how to add images to your sidebar. Images include the awards that new bloggers receive, and so I am posting this for them! Lately, many people have been clicking on my award posts, mainly for The Liebster Award (it is currently number one in the search engines!), and since these bloggers are newbies (like I was, months ago!), I decided to answer a question one blogger had (ironically, the person who tagged me as IT) about how to add images to your sidebar.

Adding them is not that difficult, but requires a few steps. I explain these in this the video below, and show you how to do it at the same time. Unfortunately, Read More